

In this scenario, you are a local user who wishes to access the Control Panel through its USB interface. You are equipped with a USB key. The Control Panel will behave as a USB Mass Storage host while the USB key will be a USB Mass Storage device. Since the Control Panel behaves as a host in this mode, it has full control over its own memory and over the memory of the attached USB device.
Plug your USB key to a miniA plug to STD-A Receptacle OTG cable to adapt to the miniA-B receptacle on the board the Control Panel is running on. Then plug the cable to the board. Thou shall see the USB sign appear on the LCD(last column of the second line), and the menu line of the LCD(3rd line) should change as pictured on the following:
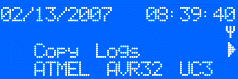
The symbol on the last column of the menu line(a right arrow) tells the user that there is another available action in this menu: to access it, push the joystick to the right. You shall then see the following:
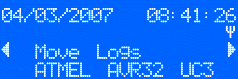
The symbol on the first column of the menu line(a left arrow) tells the user that there is a previous available action in the menu: to access it, push the joystick to the left. You shall then go back to the previous screen(displaying the "Copy Logs" action).
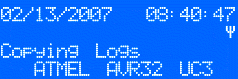
To copy the data logs the Control Panel has been recording to the USB key, press the joystick. This will create a /LOG directory on the USB key and copy all the log files from the Control Panel's internal file system to that directory. The menu line will display a message while it is performing the requested action.
To move the data log files from the Control Panel's internal file system to the USB key, press the joystick. This will move the content of the Control Panel /LOG directory to a /LOG directory on the USB key. The menu line will display a message while it is performing the requested action.

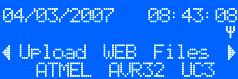
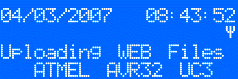
The USB key may hold a /WEB directory holding a version of the web server files. To update or add the WEB server files of the Control Panel, press the joystick. The content of the USB key /WEB directory will be copied over to the Control Panel file system /WEB directory. The menu line will display a message while it is performing the requested action.
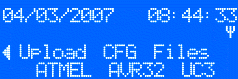
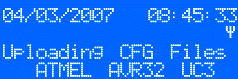
The USB key may hold a /CFG directory holding sensors & system configuration text files. To update or add configuration files of the Control Panel, press the joystick. The content of the USB key /CFG directory will be copied over to the Control Panel file system /CFG directory. Note that we've reached the end of the menu (no right arrow on the last column of the third line of the LCD). The menu line will display a message while it is performing the requested action.
For further information, visit Atmel AVR32.
 1.8.5
1.8.5