

In this scenario, you are a local user who wishes to use the Control Panel to send mail upon alarms or with periodic logs. You are equipped with a PC.
You will need a SMTP server. There are several configurations, so we assume your EVK1100 is plugged to your PC, as described in the web server section.
You can use Windows XP SMTP server or download a free one.
See also Installation & configuration of exim (the cygwin SMTP server) on a PC for details on installing and configuring a GNU(GPL) SMTP server included with Cygwin(exim).
Once you have a SMTP server configured, you will need to set up the Control Panel to have it sending mails.
Default Control Panel application does not come with the SMTP client compiled.
If you want to know if SMTP is embedded in your Control Panel version, use the web server and browse for the "System Configuration" web page.
If the SMTP fields are filled with NotCompiled text, then you will have to add SMTP client to your version.
Otherwise, you should directly go to chapter 3) Configure the SMTP client..
You will have to turn it on in your favorite compilation environment.
Edit the file "config.mk" and replace SMTP_USED=0 with SMTP_USED=1 in the definitions.
Then build the Control Panel and program your EVK1100 with this new version.
Right click on the project and select options. In the new window, choose C/C++ compilers item and go to the preprocessor tab.
In the section Defined symbols: (one per line), edit SMTP_USED field and set SMTP_USED=1 to enable SMTP compilation.
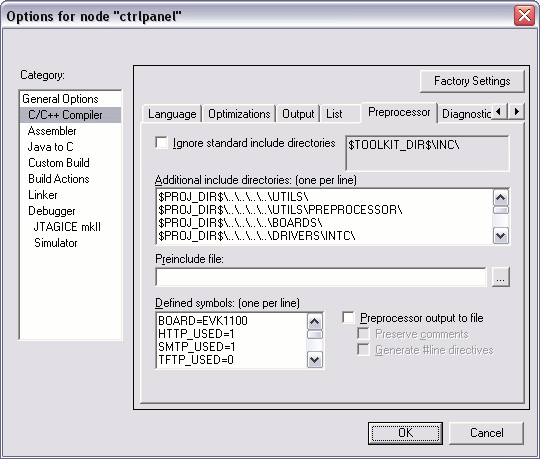
Then build the Control Panel and program your EVK1100 with this new version.
You now have to configure your SMTP client to have it deliver mails to the SMTP server.
Use the web server and browse for the "System Configuration" web page.
Fill the SMTP section fields with :
The Control Panel will send mail to the recipient previously configured upon several actions :
You do not have to set up anything to allow the Control Panel to send mail upon this event.
Once a log file has reached the maximum file size, it is written on the file system.
Then an email will be sent with this file content.
In order to trigger an alarm on a sensor, you will have to allow it for this sensor.
Browse the "Sensors Configuration" web page, and set the alarm field for this sensor to value "on". Submit this change by clicking the "submit" button.
Trigger an alarm for the configured sensor, and check your mailbox, you should have a new message.
For further information, visit Atmel AVR32.
 1.8.5
1.8.5